¶ User Account Setup in Business Central
¶ Navigation
1. The user must first navigate to the Business Central portal. User account must be set up beforehand by an existing user to provide the necessary access.
After a successful sign in, the user will be prompted with the home screen;
2. The user should then navigate to the magnifying glass that is located in the top-right and type into search box “users”. A dropdown list of options should appear for this search:
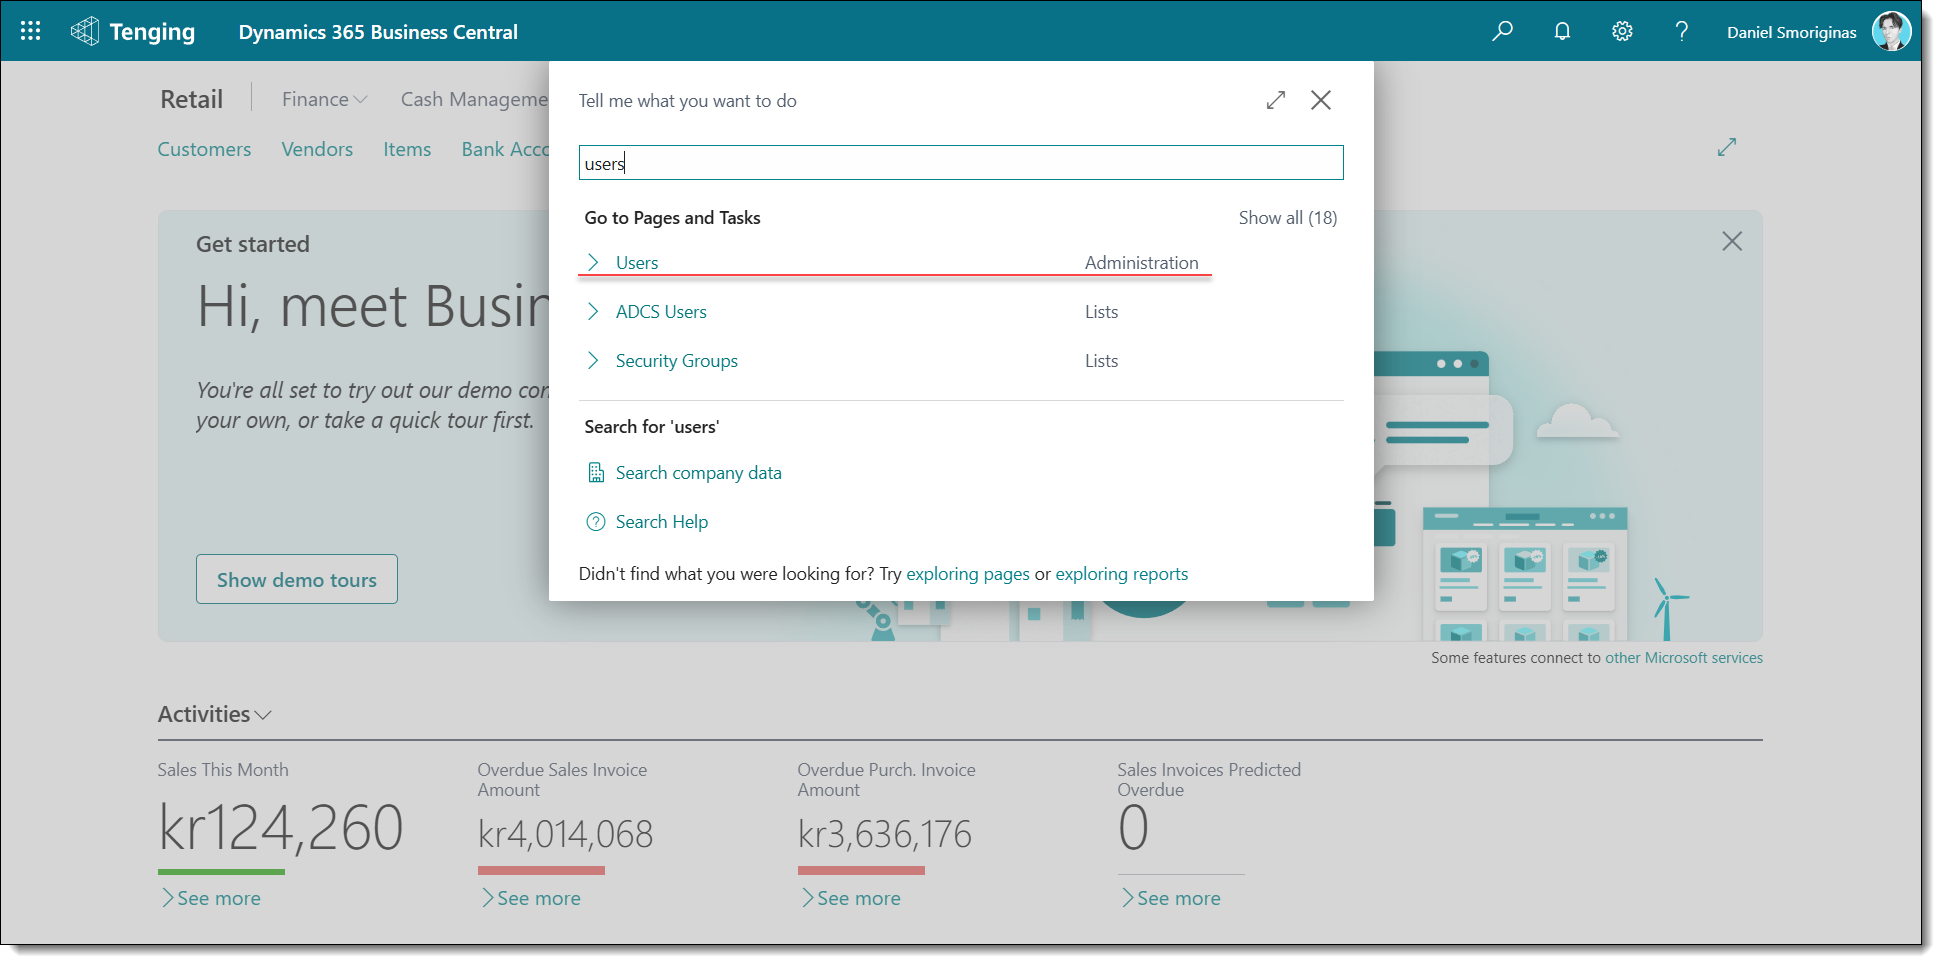
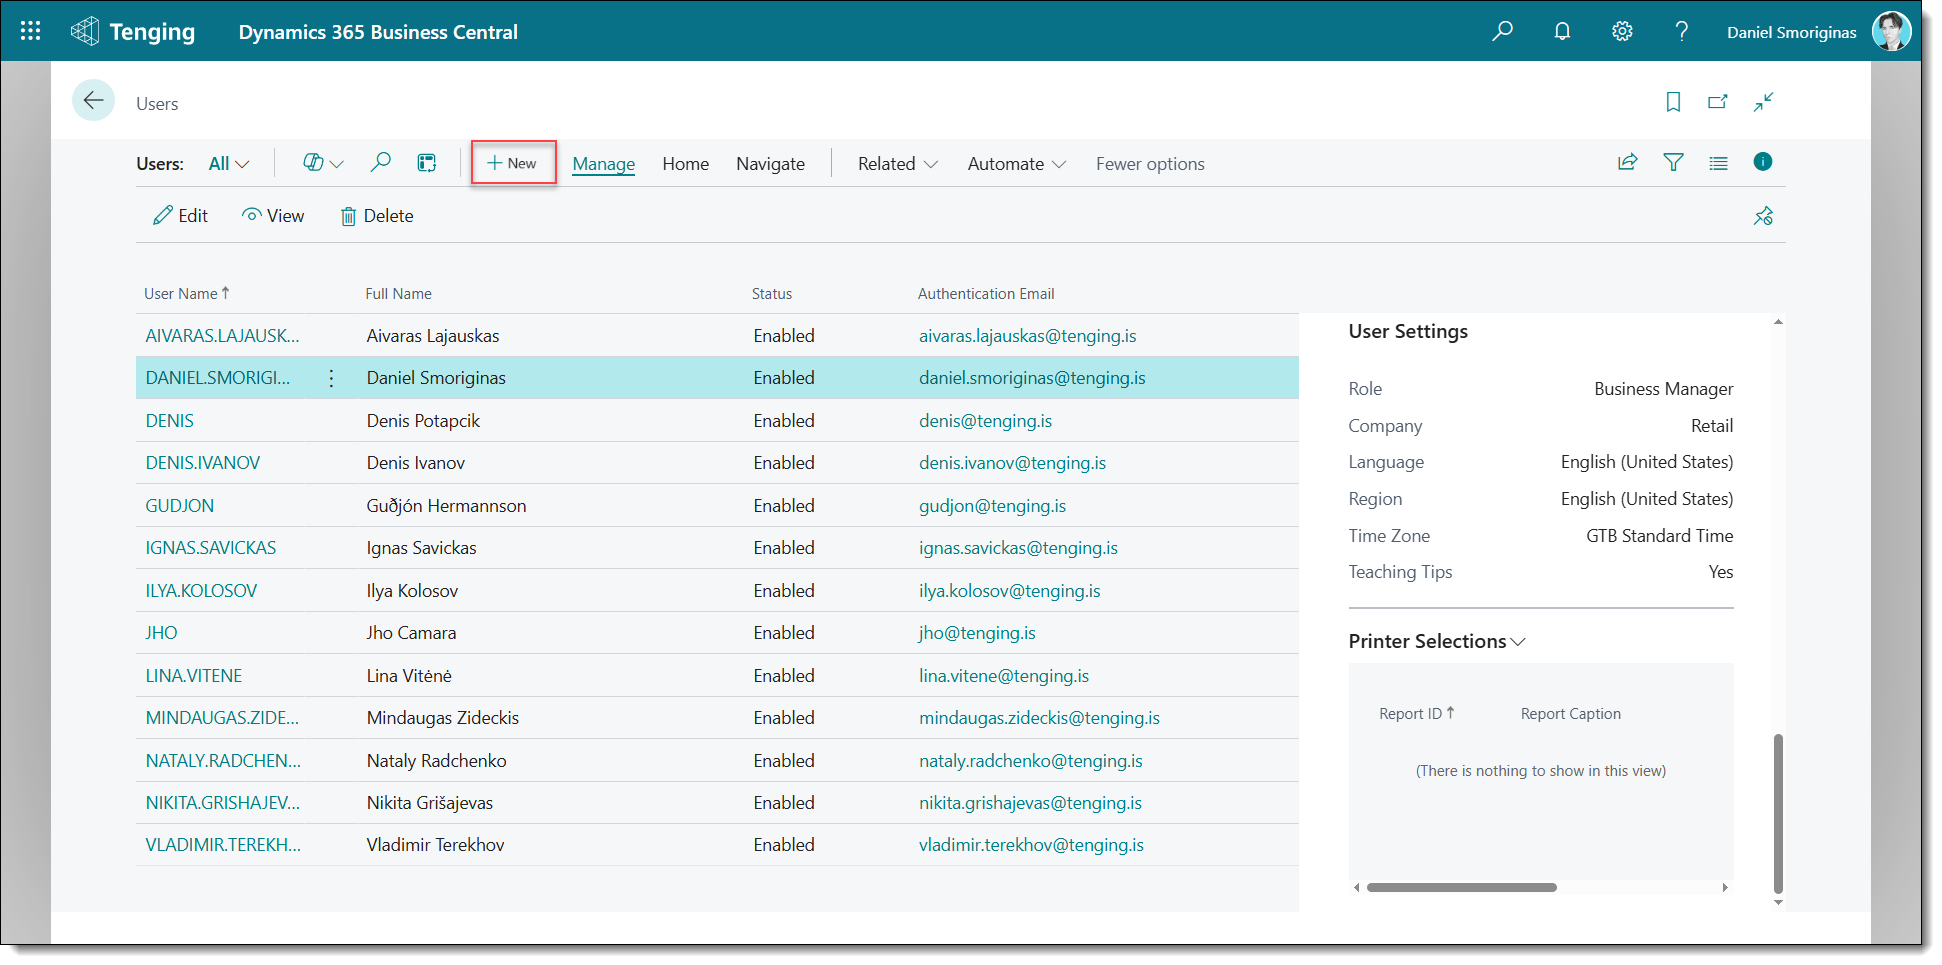
3. This page will list all of the users in this Business Central environment & legal entity. By clicking the +New button, the user will be taken to the user creation card:
¶ New user creation
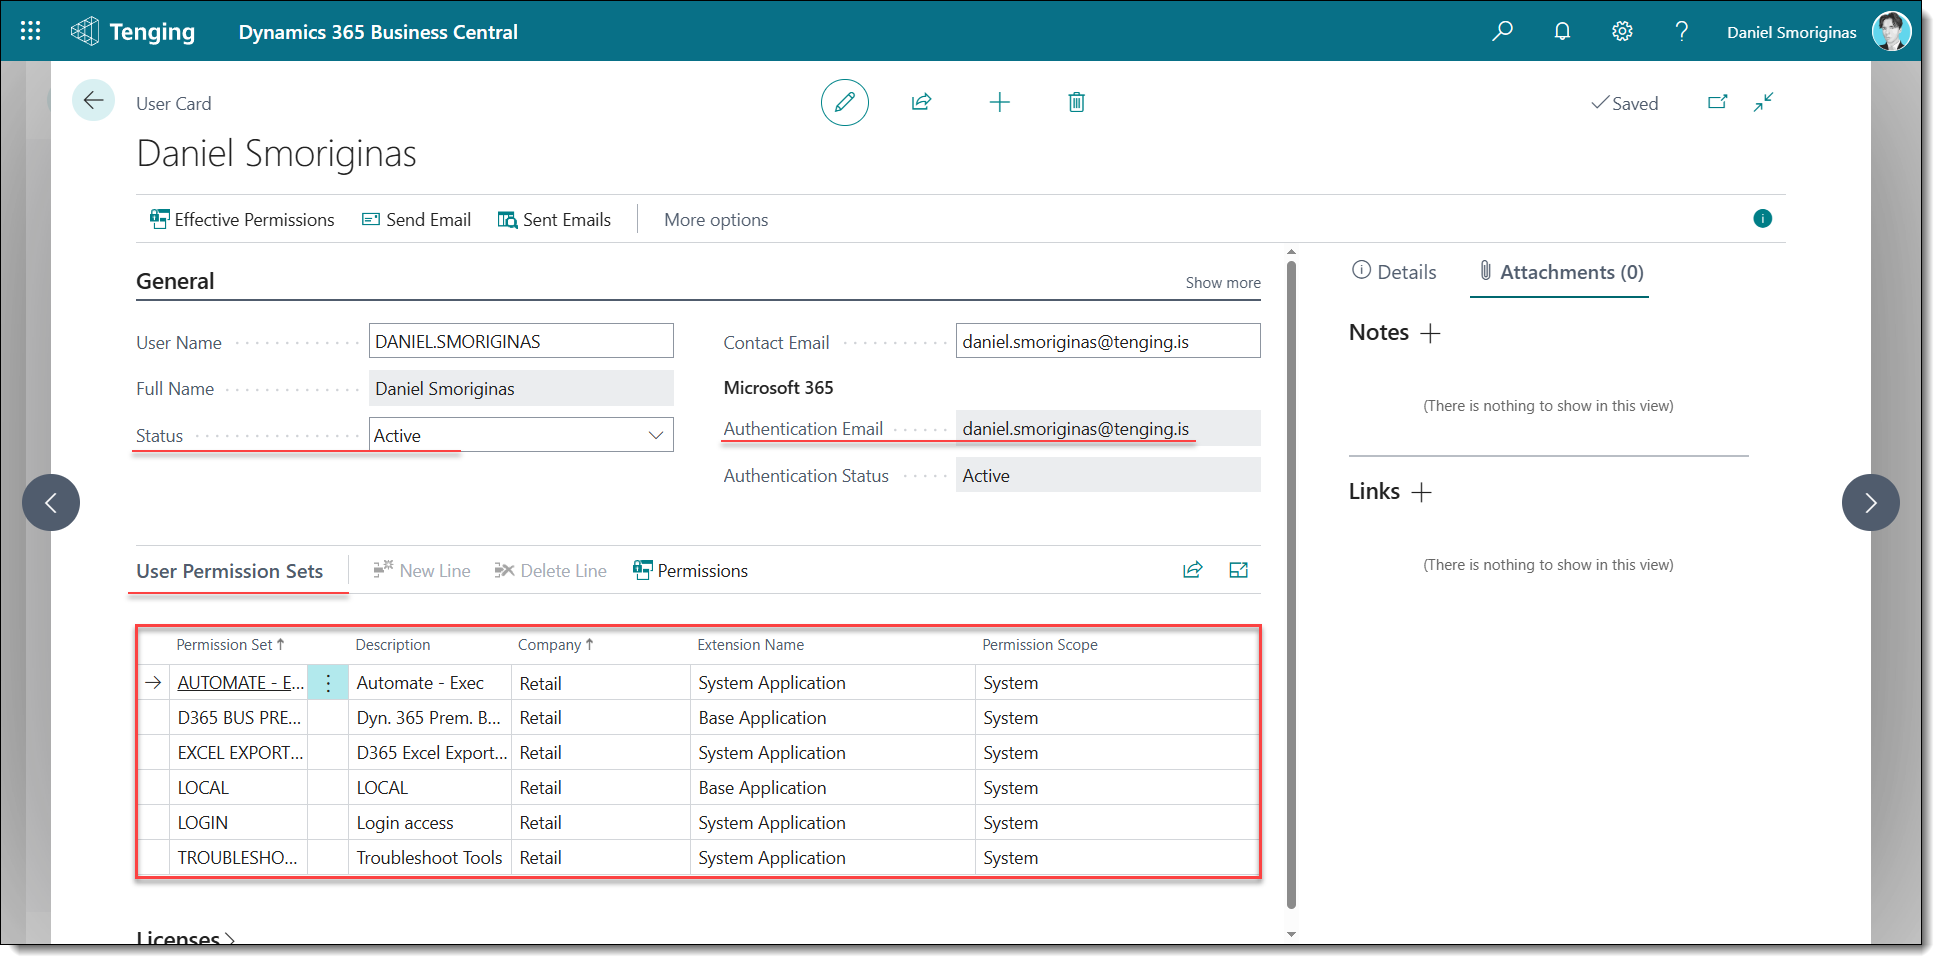
After pressing the +New button, the user will land on the User creation Card. To successfully create a user, they must enter correct information into the following fields:
-User Name - This field is mandatory and must be unique as it is the user ID;
-Full Name (Not mandatory);
-Licence Type - Auto-completed;
-Status - Set to Active automatically;
-Expiry Date - Keep this field empty to avoid issues with logons down the line if the user will be perpetually signing into this environment. Otherwise, the user will be deactivated at a certain date;
-Contact Email - This is not mandatory but can be used for notification and usage purposes;
-Authentication Email (Must be the email address that they will be using to login via Microsoft SSO);
-User Permission Set(s) - Set this to SUPER if the account will require full administrative access, otherwise this must be configured based on the company role of the user.
After filling in the required information into the fields, the user has to left-click once outside of the field to save the newly-inputted information (except the action fields) and create the user.
¶ FreshLot Account Setup in Business Central
¶ Warehouse Employees
1. Search for Warehouse employees and select the option from the dropdown list under the Administration module.
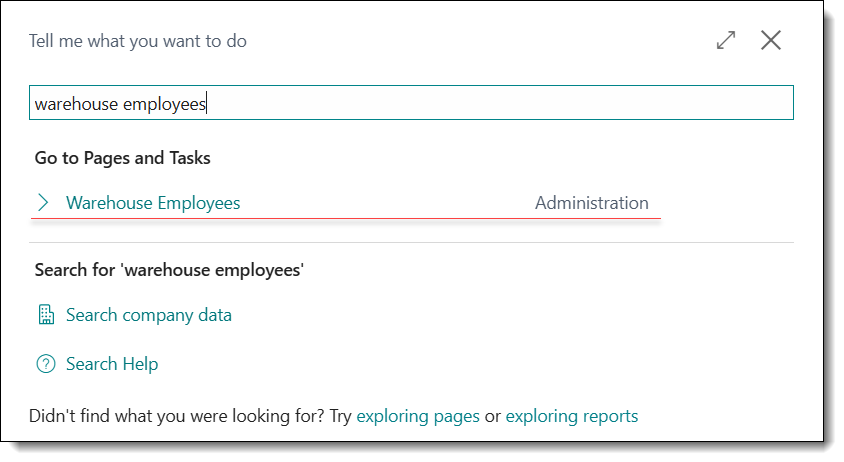
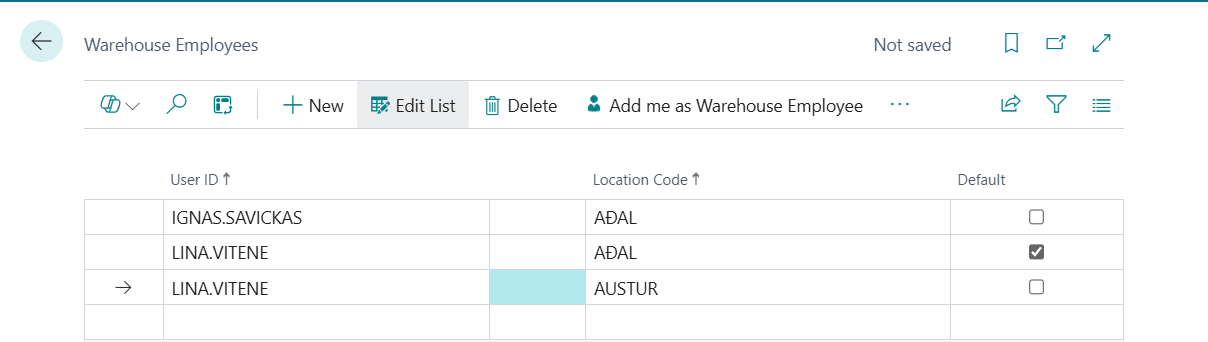
2. After clicking the “Warehouse Employees” link, the user should land on the Warehouse Employees list. Users should be set up as Warehouse Employees in Business Central if they are working with warehouse documents.
Each user can have one default location assigned.
Users can view and work only with the locations they are assigned to in their Warehouse Employee setup.
¶ Freshlot Users
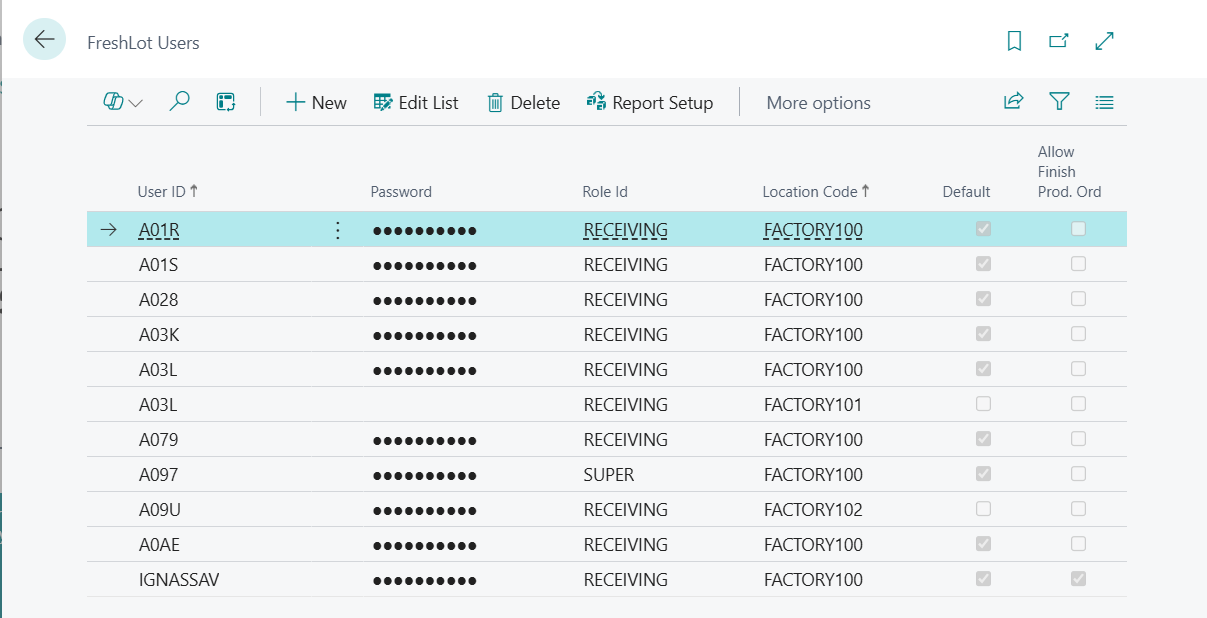
Users must be registered as Freshlot Users if they access the Freshlot Application. The following fields are required:
- User ID – Linked to an existing Employee Card. All Freshlot users must have an active employee record in the system.
- Password – Used for logging in to the Freshlot application.
- Role ID – Assigns a set of available functional areas (e.g., Receiving, Shipment, etc.). A user can be assigned different Role IDs for different locations. This allows the same user to have varying permissions or functional access depending on the location they are working in.
- Location Code – Users can be assigned to multiple locations.
- Default Location – One location can be marked as default. This location will be pre-selected during login.
- Allow Finish Prod. Order – This optional setting allows the user to finish production orders even if the minimum required quantity has not been produced.
¶ Freshlot Roles
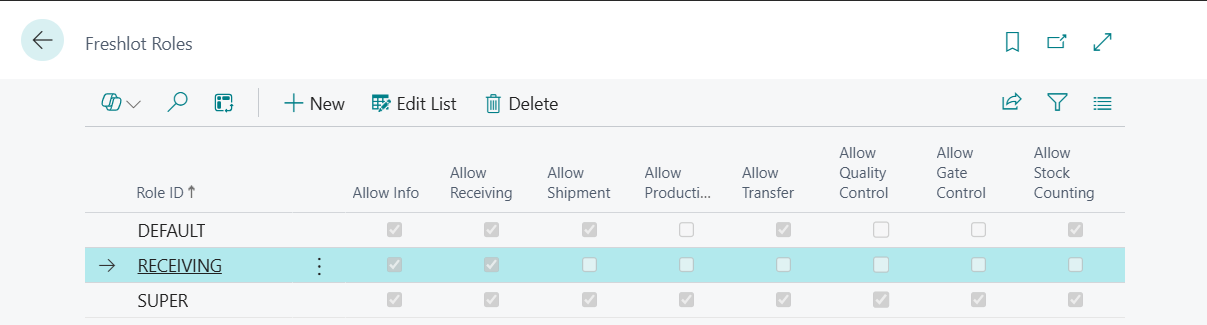
Freshlot roles is a set of available functional areas in the Freshlot Application.
¶ New FreshLot employee creation
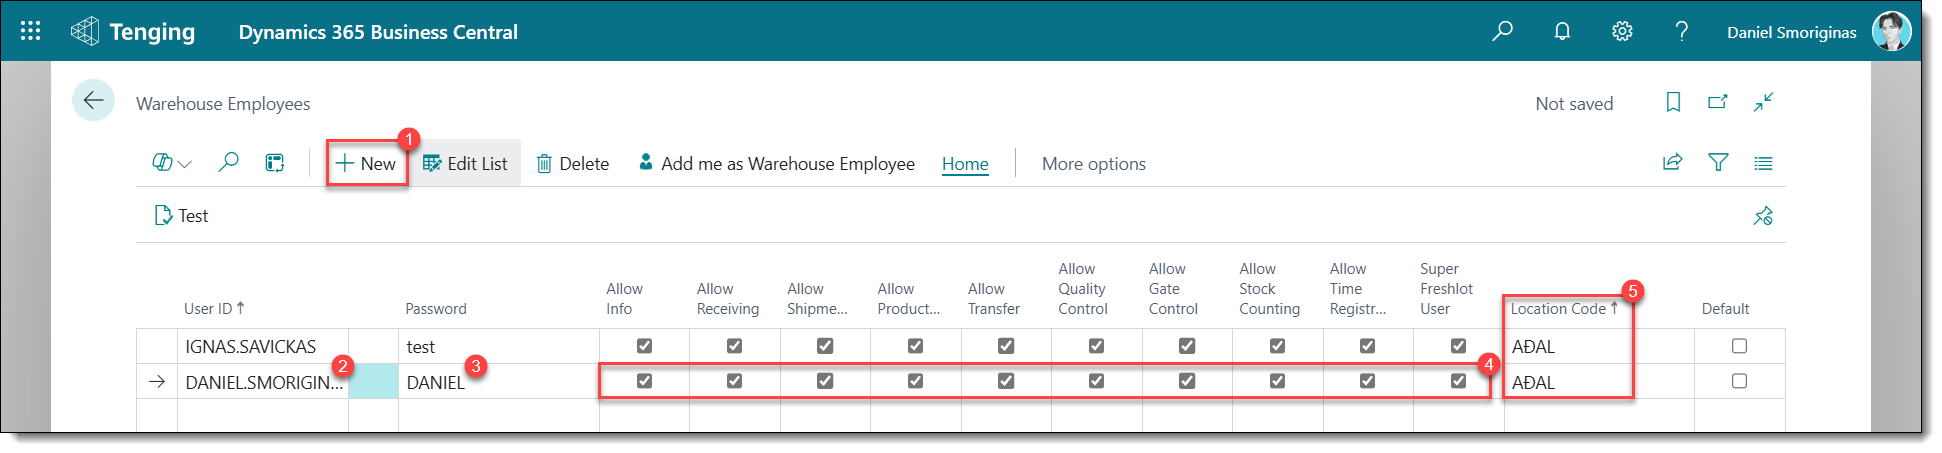
1. To create a new warehouse employee, the user needs to click on the +New button which is located on the top left on the ribbon menu;
2. After clicking +New, an empty line should appear. The user will then need to select a User ID from the drop down list (A user needs to be created ahead of time);
3. A password needs be created and written down in the password field. A password is only required for one location for authorization;
4. To setup access to FreshLot for new users, an existing user needs to click on the required check marks;
5. After setting up access, the user needs to select a location. For every location, a new user warehouse employee line needs to be created;
6. After completing the previous steps, one of the warehouse employee lines needs to have a default location by selecting the Default check mark on the right side;
7. Click off of the current line to save the current changes.
Field explanation and navigation in picture below:
¶ Devices
To add physical devices such as printers or scales to the Business Central Environment, follow the steps below to begin adding the required details to the Devices List and User Device List.
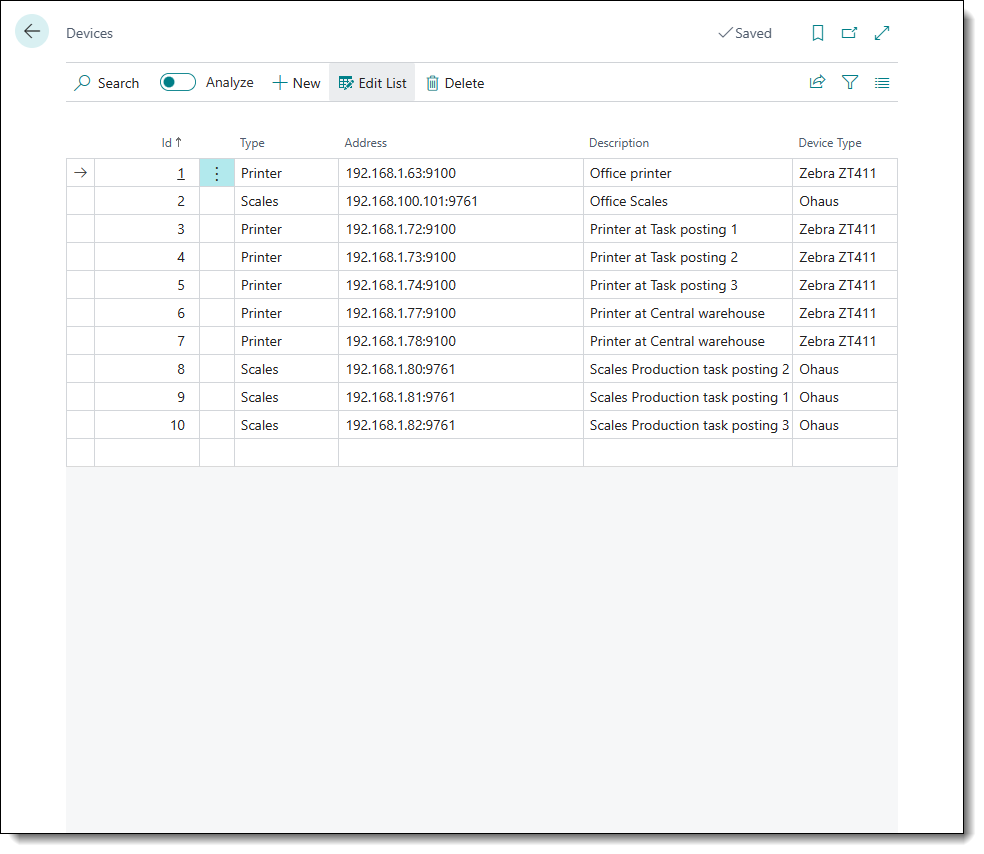
¶ Devices List
1. To add devices to the Business Central environment, navigate to the Devices list and begin filling out the fields;
2. The Id field is auto-populated upon creating a new line;
3. The Type field contains the options: Printer, Scales, and Computer. Choose an option based on the device type;
4. The Address field must be filled in with the local IP address and port (divided by a colon) of the device;
5. The Description and Device Type fields are optional but should be used to describe the device;
6. Left-click off the line once to save the changes made.
¶ User Device List
This configuration must only be set after added the device to the Devices List mentioned above. The device Id value will be used to assign the peripheral to the User Device List record.
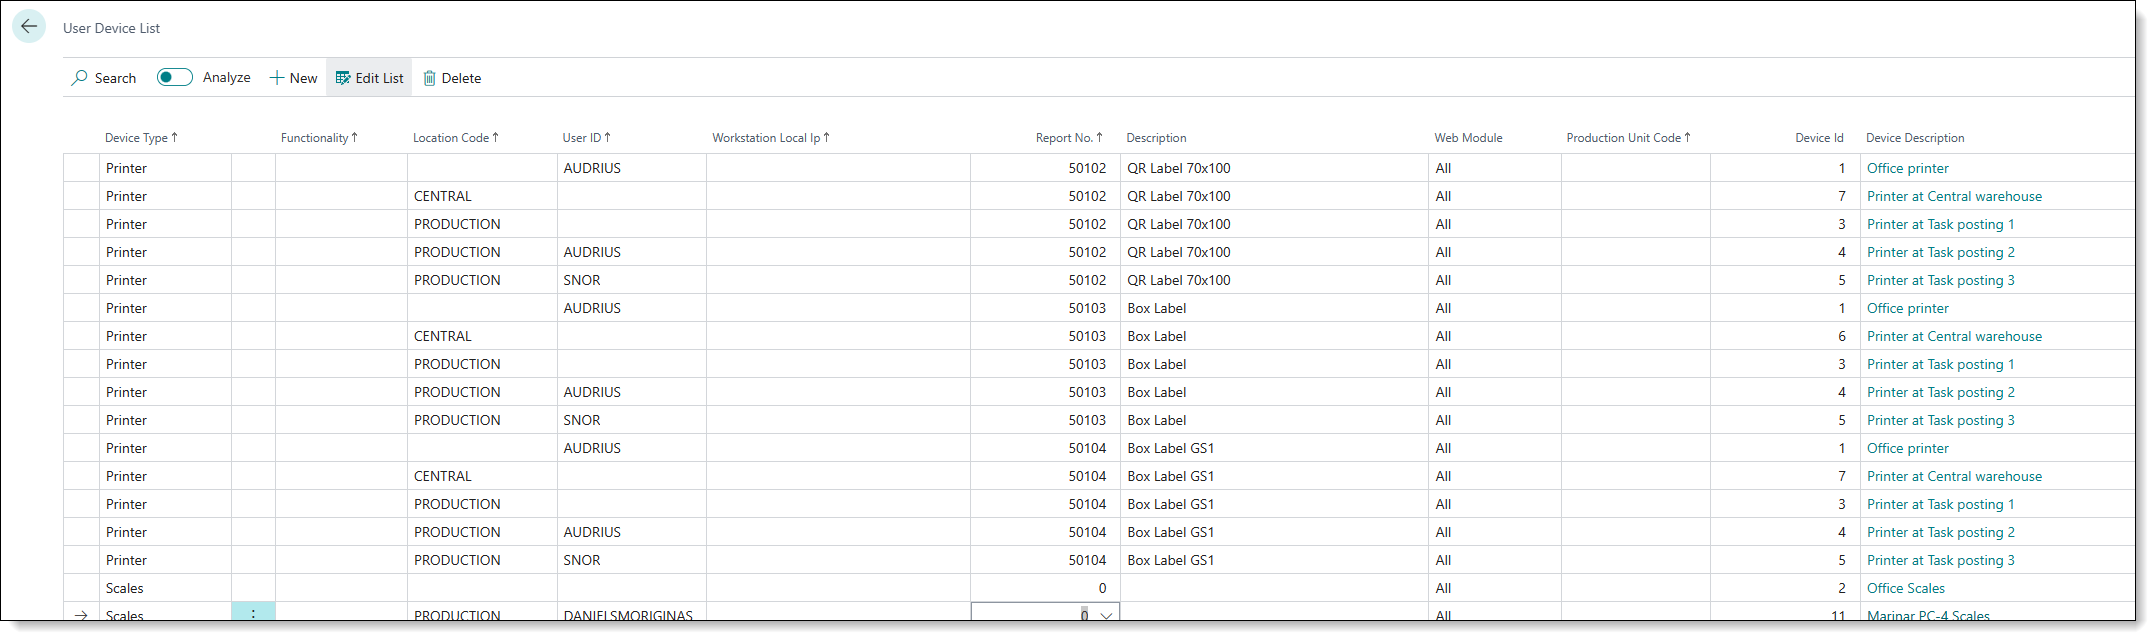
Device Type - The Device Type field is used to indicate the type of peripheral that is configured in this user device list line. This field is auto-populated
Functionality - This is a dropdown text field describing the Report No. value for the selected record;
Location Code - This field is used to indicate the location code of the peripheral device placement;
User ID - This field is used to indicate the Business Central environment identification code of the back office user/warehouse employee to whom this device is assigned to;
Workstation Local Ip - This field is used to define the local IP address of the computer/machine that this peripheral would be assigned to. Based on this setting, the device would only be pairable to this specific machine;
Report No. - The Report No. corresponds to the label type which will in turn affect the design and layout of the label for printing. This should only be defined for Printer Device Type. The reports have also been renamed to reflect a more legible nomenclature.
Description - The description field is an auto-completed, read-only field which is used to describe the selected report no.;
Web Module - Unused field;
Production Unit Code - This field is used to specify corresponding code of the production unit to which this peripheral device will be tied to;
Device Id - This field is used to indicate the corresponding device ID from the Devices List;
Device Description - This field is an auto-completed, read-only field used to describe the device indicated in the device ID. This value is fetched from the Description field from the Device List record.
¶ Label Types
50102 - QR Label 70x100 -> Item Packaging Label;
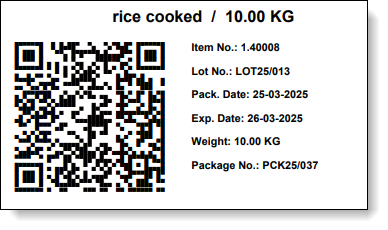
50104 - Box Label GS1 -> Box Label (External);
1.png)
50103 - Box Label -> Box Label (Internal).
1.png)
¶ Label Rotation
In User Device List table you can modify the Zpl Rotation field to 90 (or 0) for specified Device entry - it will be applied only to this one entry:

or go to Report Setup table and modify the Zpl Rotation field - it will be applied to the specified report globally:
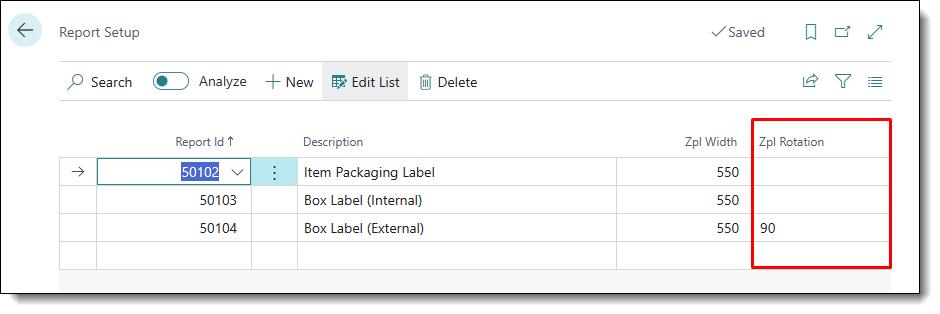
For label size ratio - adjust the Zpl Width field. Currently, in the Report Setup table it is set to 550 for all reports globally.