¶ Receiving Role
This role streamlines the receiving processes and provides staff members the tools necessary to register any additional tracked information.
¶ Highlights:
- Automated Store/Location assignment based on workstation IP
- All input can be completed using a touch screen and custom field-specific on-screen keyboards, eliminating the need for peripheral input devices.
- Available vendors and Purchase order filters configurable in Nav.
- Printer and Scale integration.
¶ Login and location assignment
The receiving role login screen on a touch screen device.
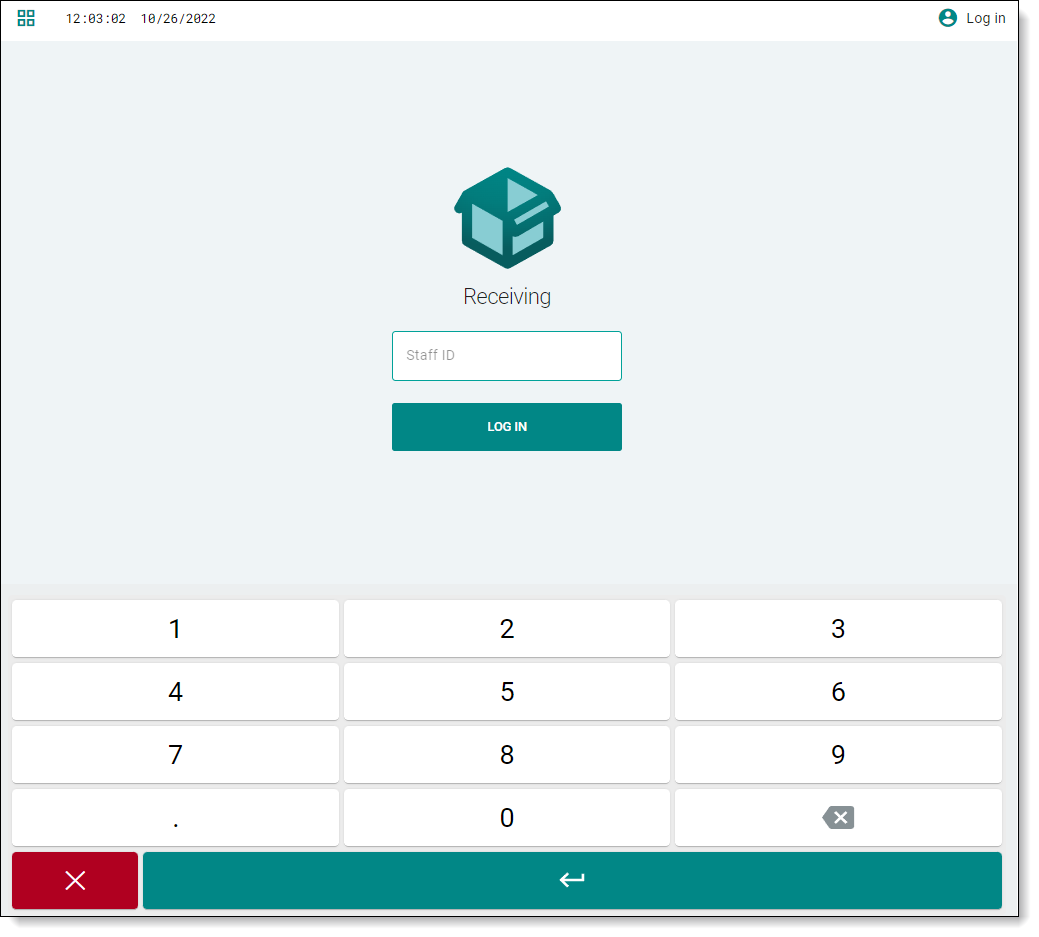
Once logged in the top bar will be populated with the current location name and the employees' name.
Location assignment is handled by IP whitelisting, providing added access limitation and automating the location selection. The employee’s login and any associated detail such as first and last name utilize the existing LS Retail Staff ID so no secondary access or user management process is required.
The IP whitelist is managed directly on each locations store card under the Freshlot tab.
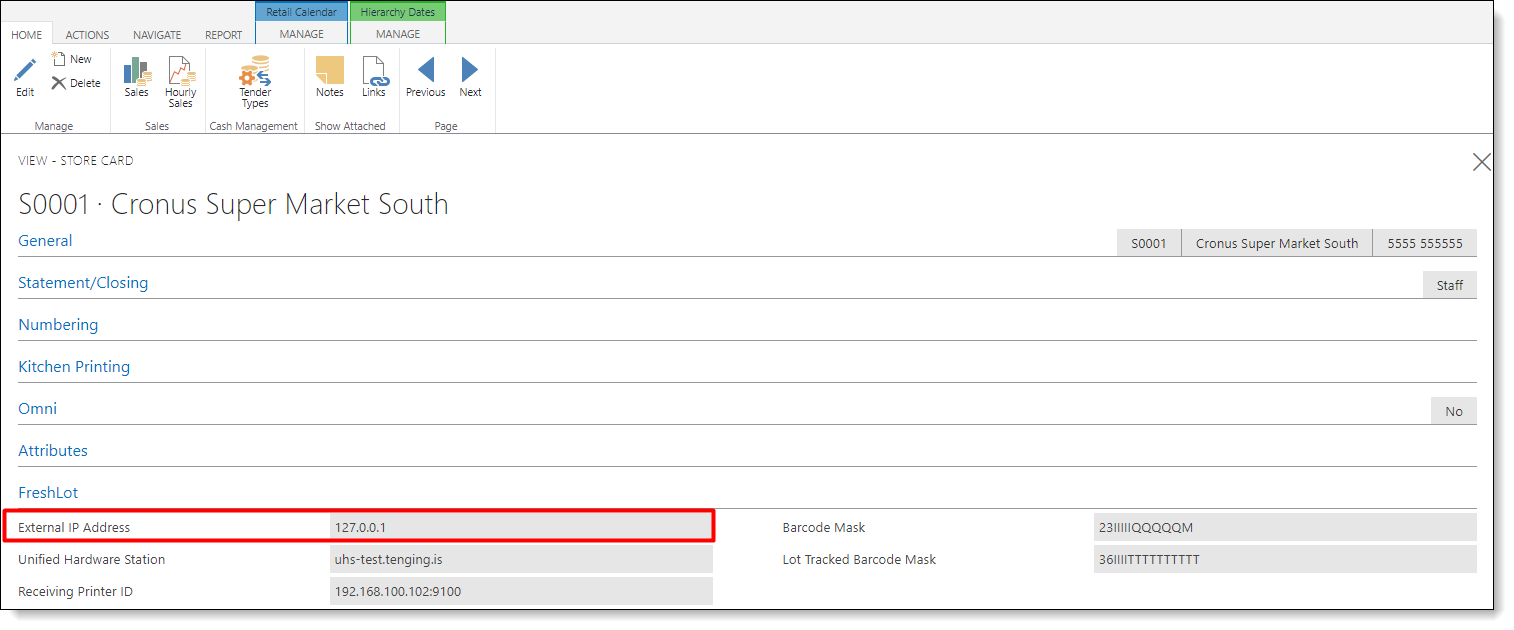
Localhost or 127.0.0.1 as the external IP will act as a wildcard allowing any external IP access to that store
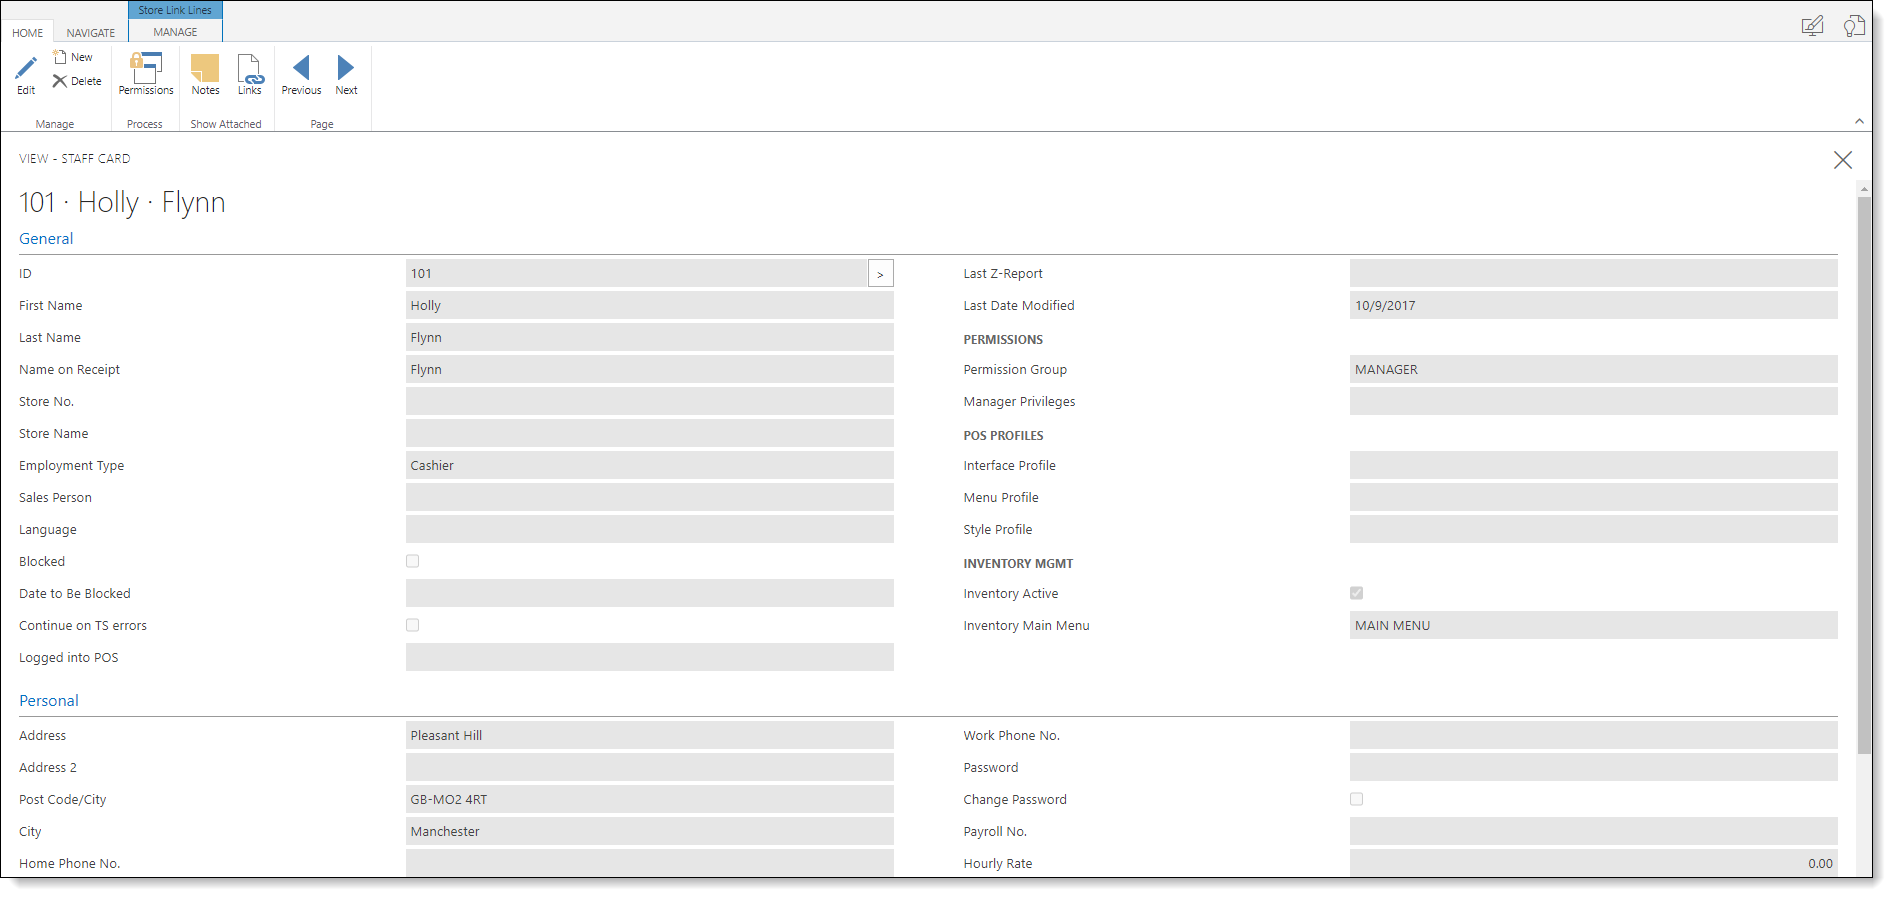
Here we have the staff card of our demo user 101, Holy Flynn.
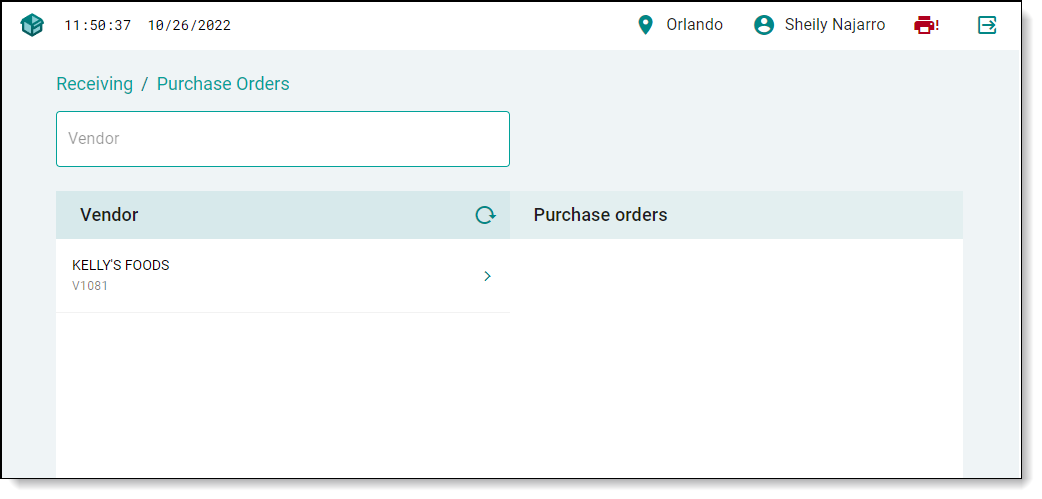
¶ The Purchase order list
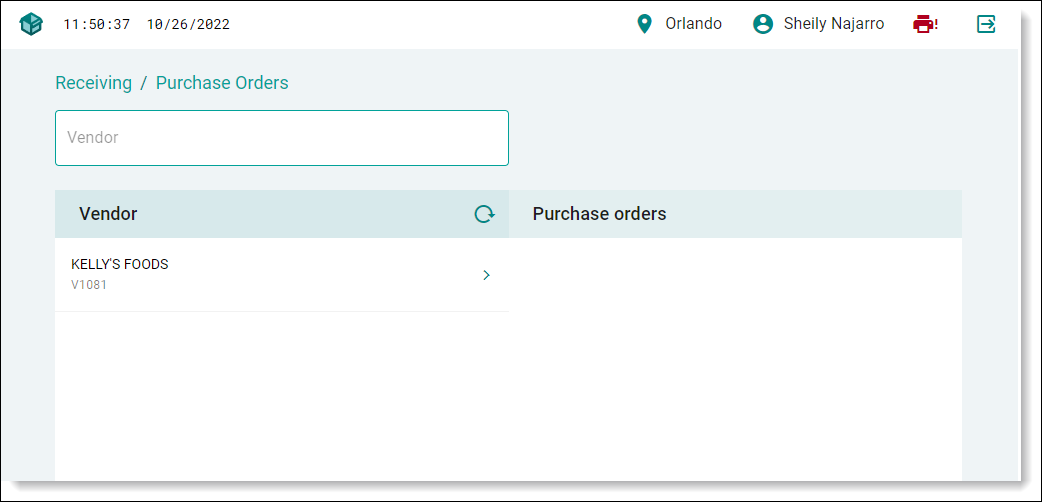
This view is designed with the intention of cutting down clutter and unnecessary data by only displaying vendors that both have an open purchase order with an expected receipt date within the preset date range and have been flagged as active in Freshlot.
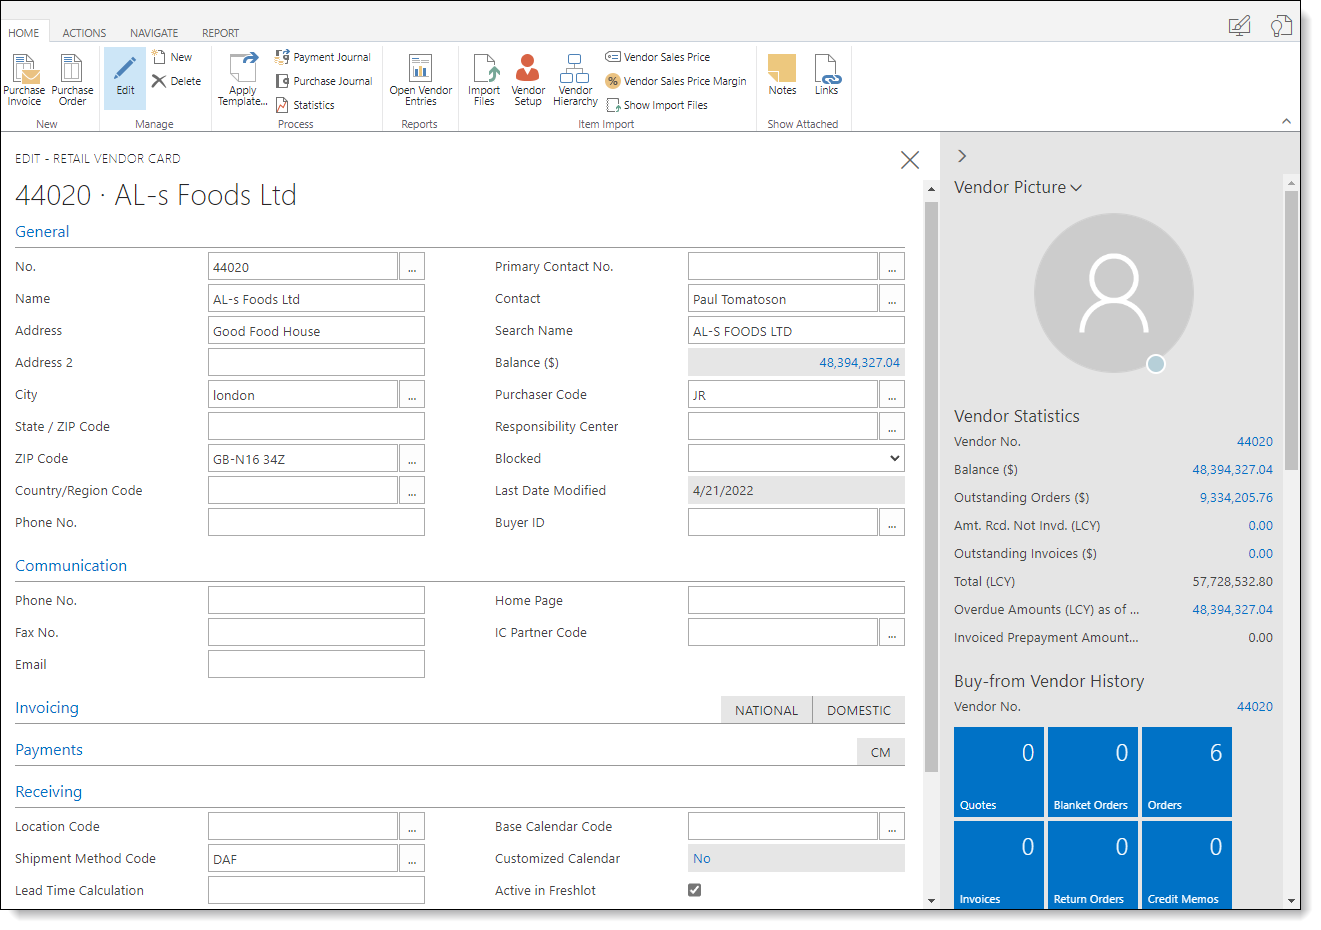
The vendor's active status is set on the respective vendor's retail vendor card:
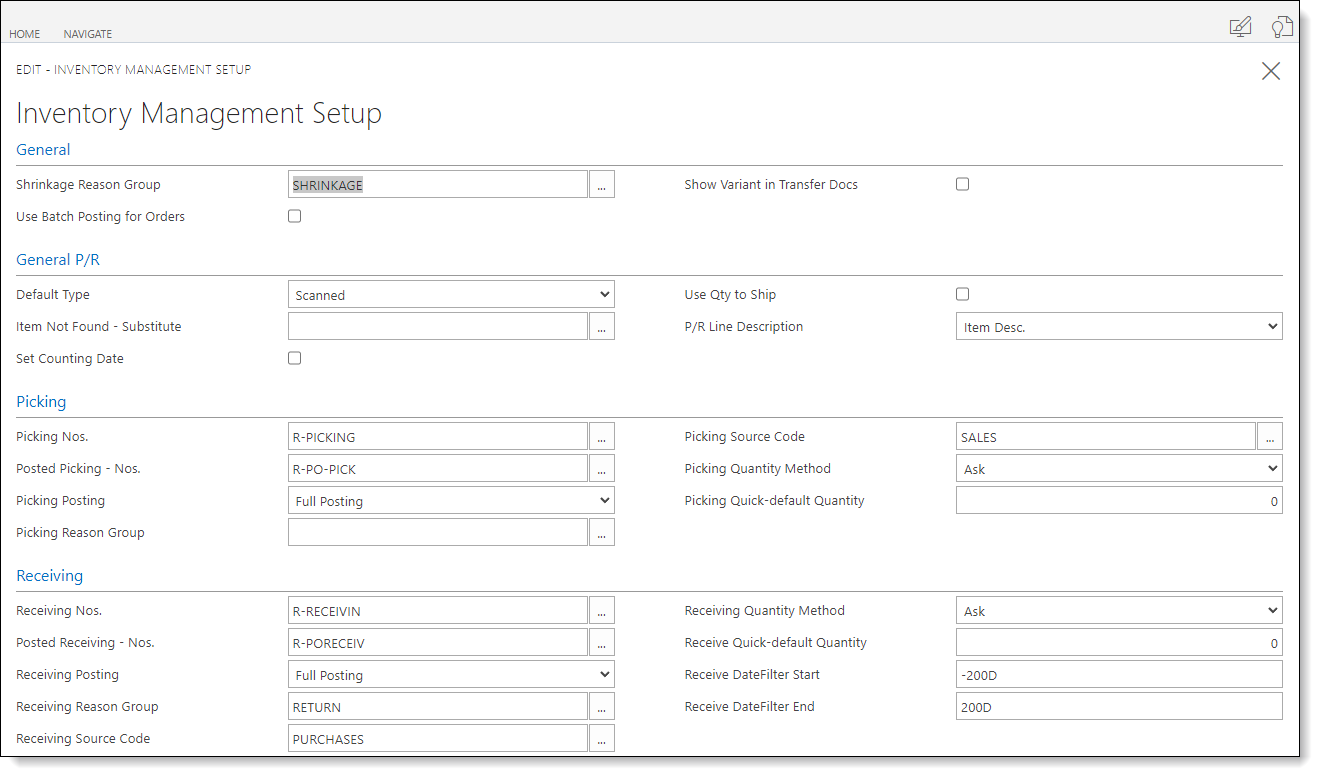
The date range preset is configured in Inventory Management Setup and uses the standard Nav date filter format:
For a Purchase order to be shown on the available purchase order list they must be:
- The vendor must be set as active in Freshlot
- The expected receipt date is within the date filter set in the inventory management setup
- Purchase order is assigned to the active location in Freshlot
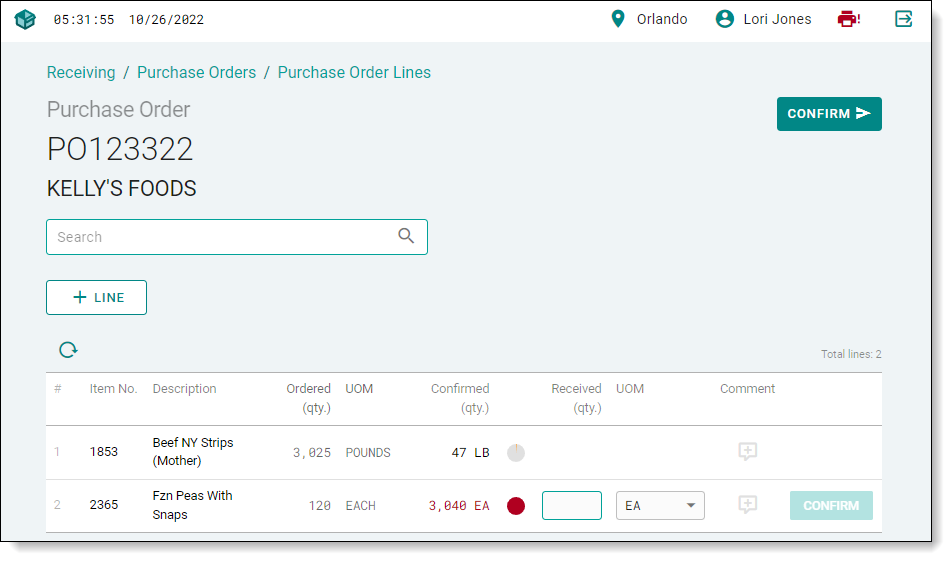
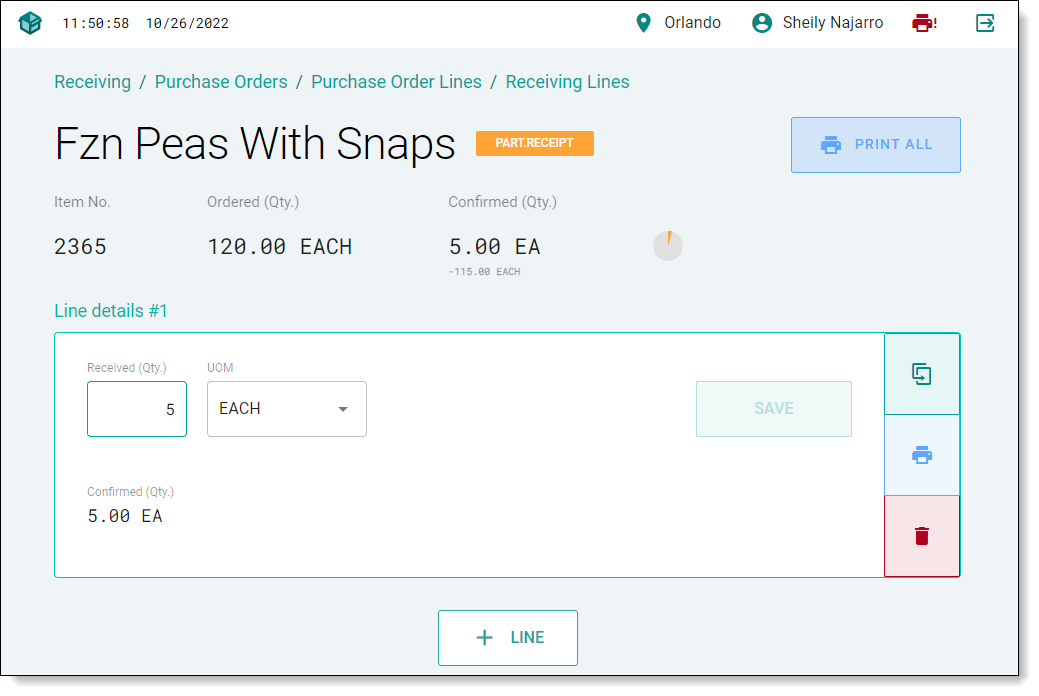
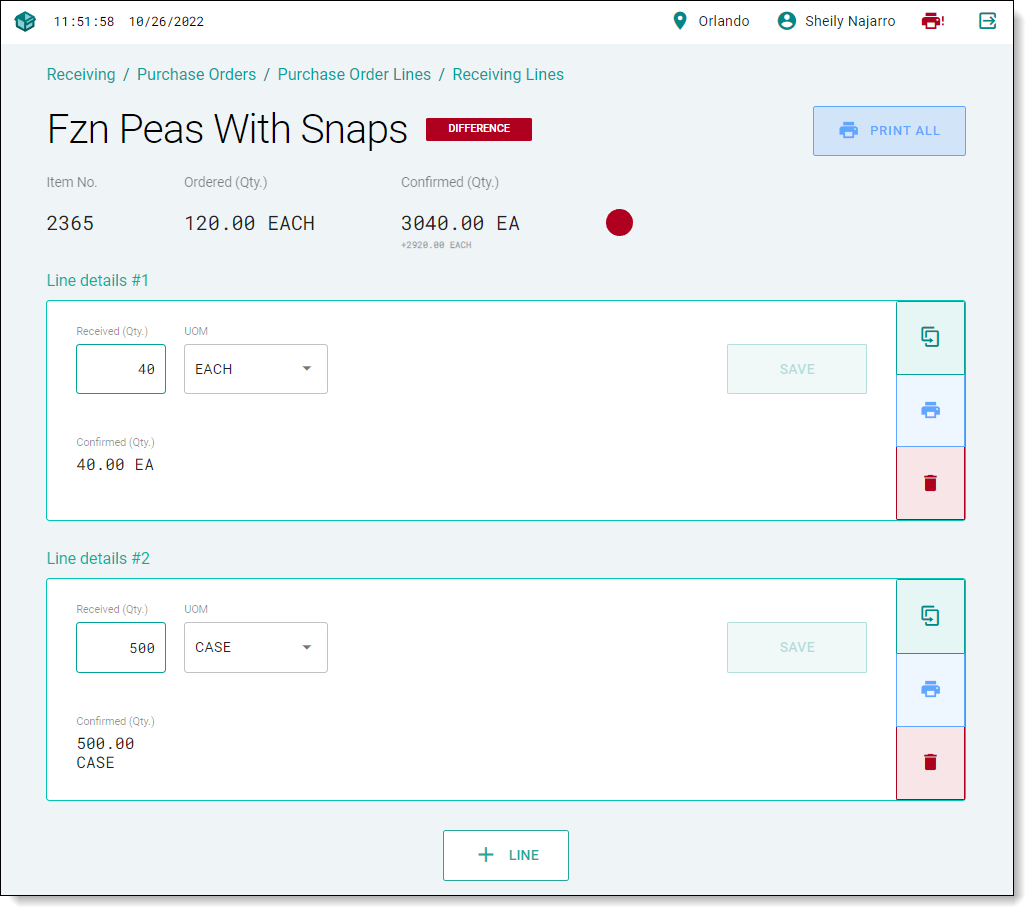
¶ Purchase order lines
In this view, we have an overview of all the lines from the original purchase order, along with the ability to receive or add items available in the vendors' item list to the purchase order through the + line functionality.
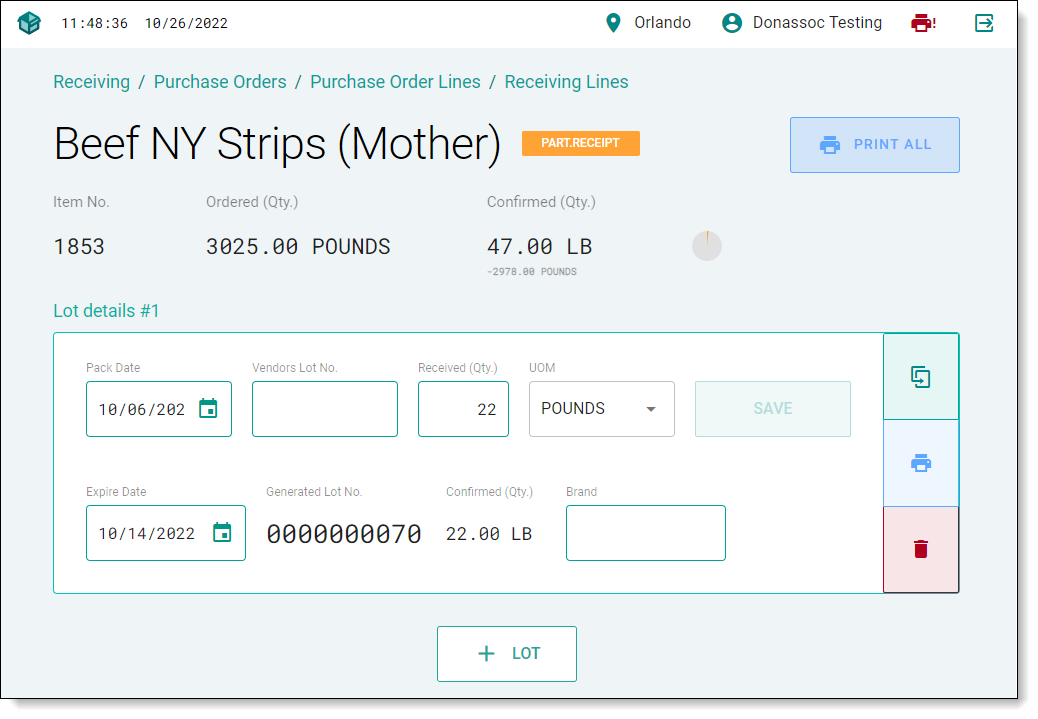
Clicking each line brings up the detailed view, where individual entries can be corrected/deleted, lot information entered and tracking barcodes printed.
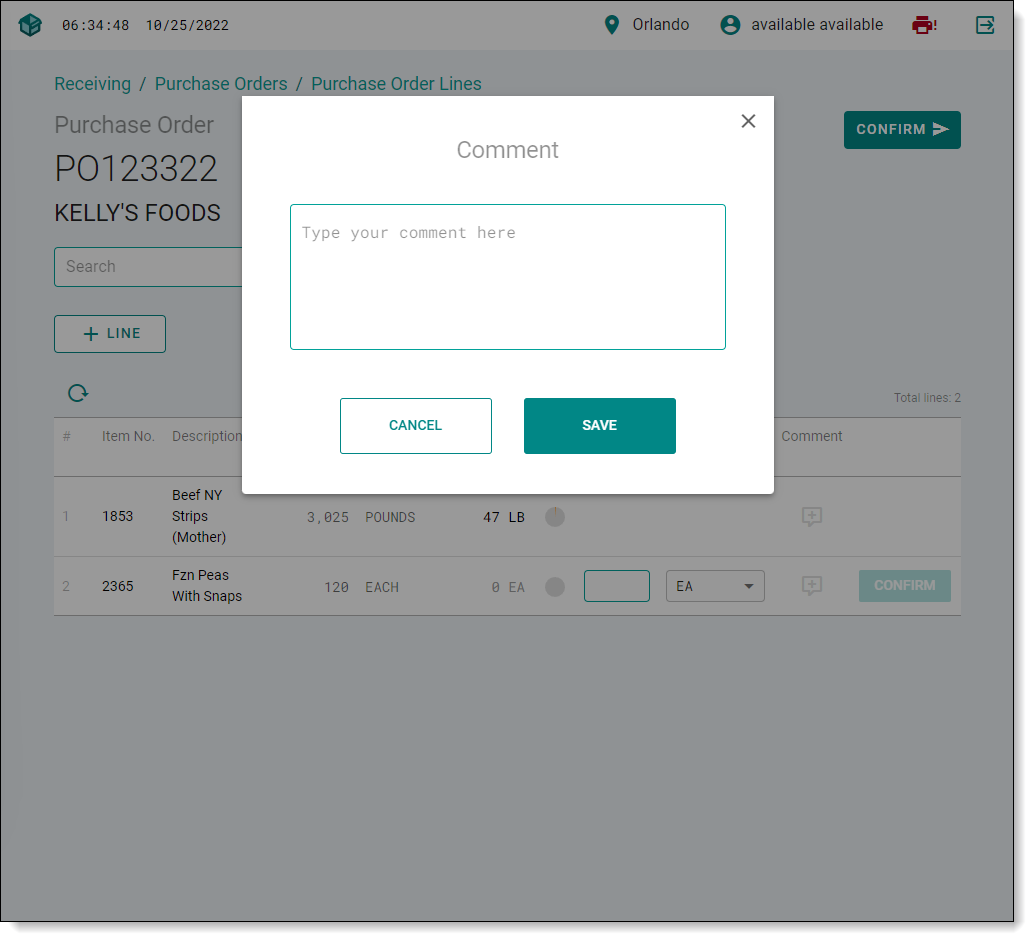
Also, you can also view/edit the Order Line comment by pressing plus sign in the Comment collum.
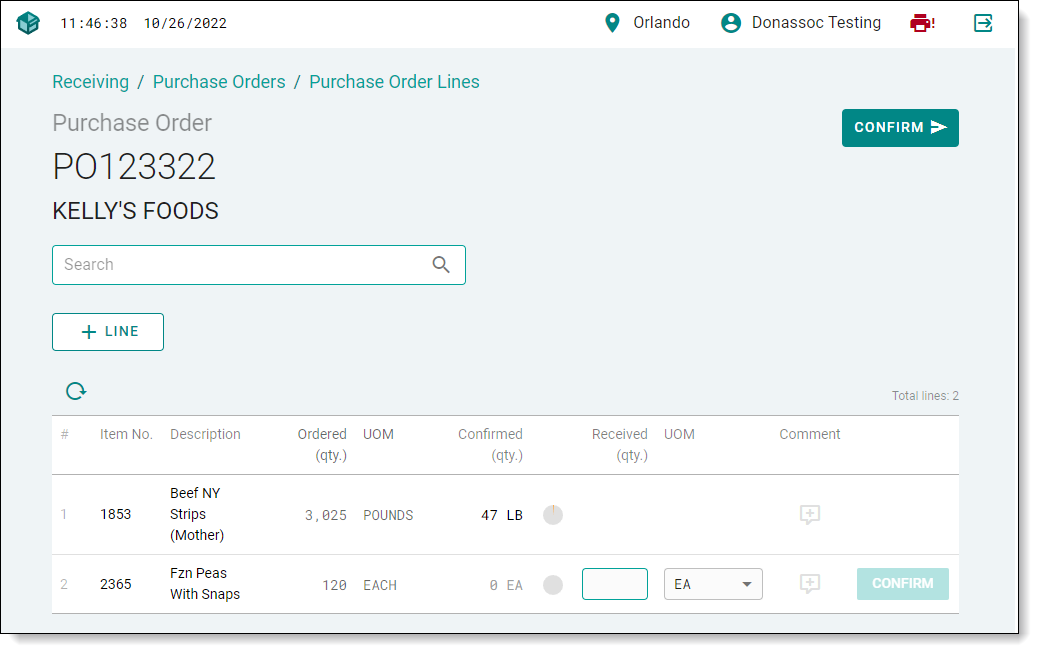
When Comment button is pressed (+),a text box opens up, where user can type in the notes or any required information.
Each individual item line will pull information from Nav such as available units of measure, conversion ratio, etc. and in turn, the product can be entered into inventory in the actual measurement it is received in, be it by weight, boxes, or cartons, or individual units.
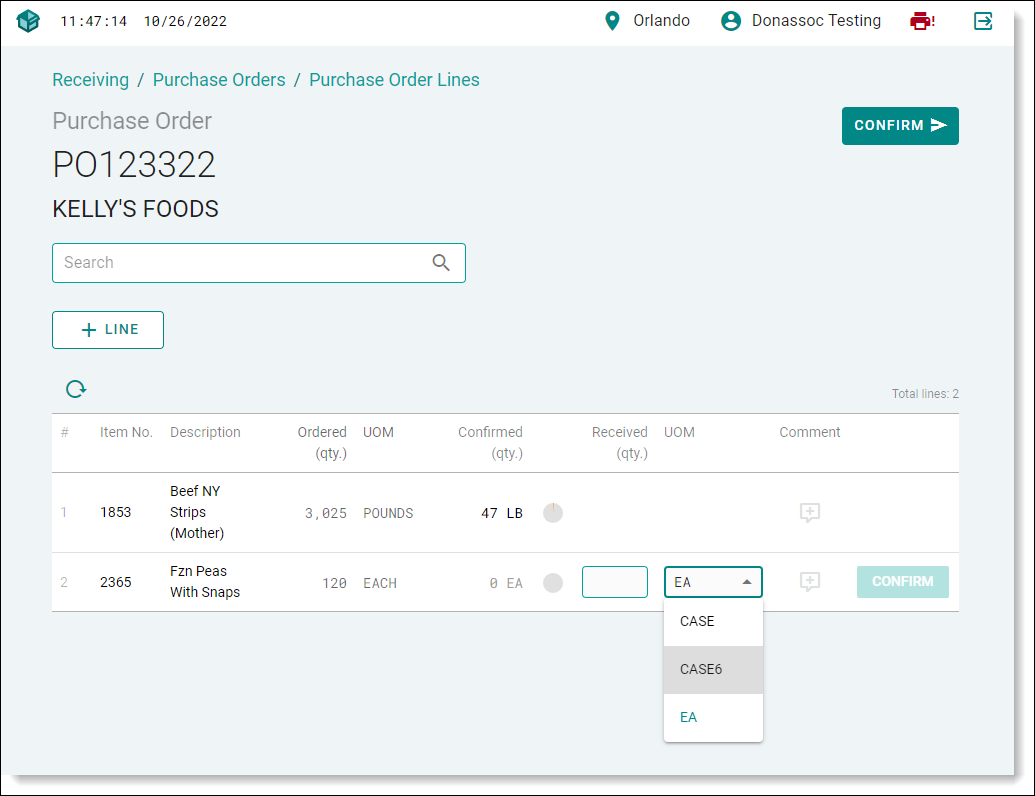
The product's unit of measure and count/weight can be entered directly in the line view and any subsequentially confirmed entry will add to the total confirmed input removing any calculations at the time of entry.
Furthermore for lot tracked products the lot details can be entered directly with the inventory receiving entry and follows the product through any future processing or movement.
¶ Purchase order line – Status
Each line is assigned a status shown as a carousel process bar in the lone view and with further details when opening the detailed view.
An unreceived line will read as “Sent” and show an empty carrousel or a blue notification color
A partially received line will read as PART.RECEIPT a partially filled carrousel based on percentage and yellow color.
A fully received line with no under/over will read FULL.RECEIPT a fully green carrousel
A line where the received quantity exceeds the ordered quantity or the conversion as dictated by item unit of measure will read DIFFERENCE a red carousel indicator
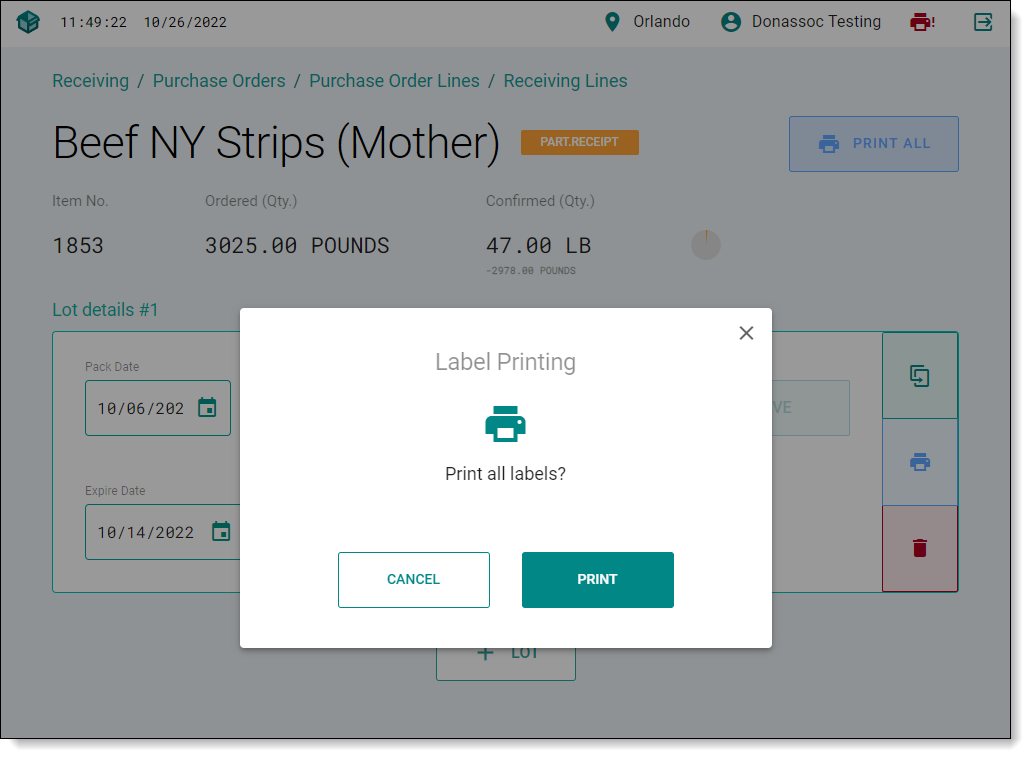
¶ Tracking labels
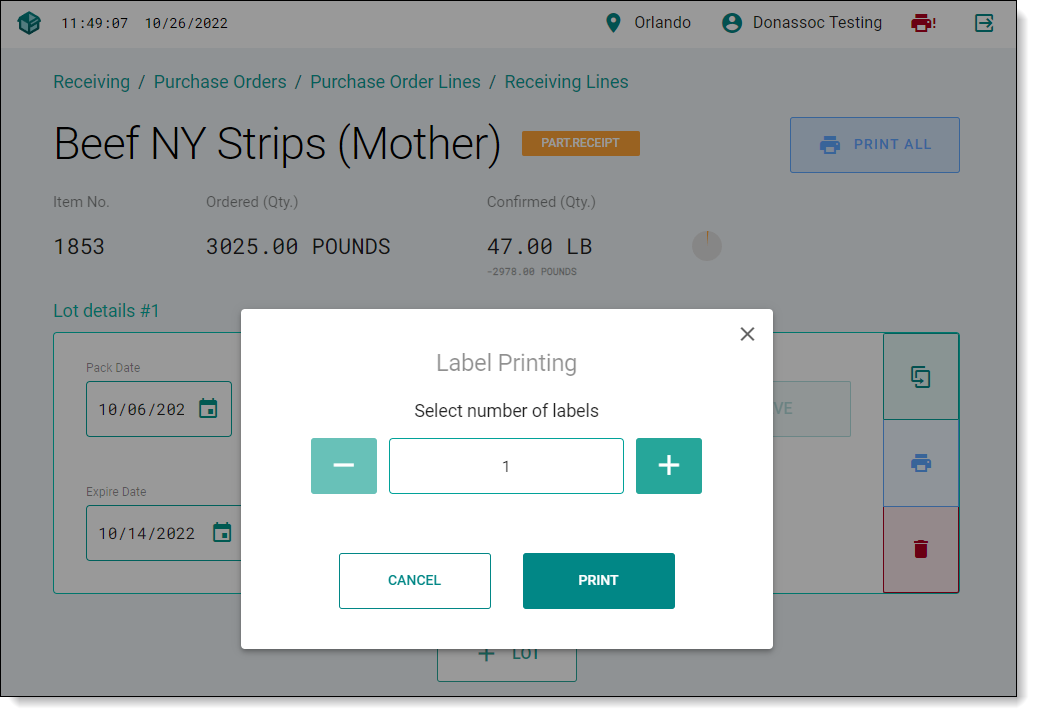
Inventory/lot tracking barcodes print functionality for each line or as a batch print function where all created entries will generate a printed label through zebra web print integration further detailed later.
When printing a single line tracking label user is prompted for number of requiered lables to print.
Executing the Print all function will return a confirmation popup window promting the user to accept the print action.
¶ Confirming Receiving
Once employees finish the receiving process they confirm the document by pressing the confirm button on the top right, this executes the back office retail receiving processes and validates any input.
As the entire process is calling Nav web services in real-time, any data entry is saved within the Nav environment and the entered/processed data gets saved directly on the retail receiving documents.
Once the back office user or a manager validates the confirmed retail receiving document they post the retail receiving document, once posted any change in the received unit of measure will be updated on the original purchase order to reflect the product as it was received, and the quantity received fields will be populated with the confirmed quantity from the Freshlot generated retail receiving document.
Retail receiving confirm and post step by step
- Populate the weight/Uom as necessary on Freshlot
- Confirm the receiving in Freshlot
- Validate in Back office and post the retail receiving document
- The original purchase orders lines will be updated the reflect the Uom and qty posted (Retail receiving)
- Post the Purchase order
¶ Zebra print integration
The label printer integration utilizes a Zebra provided utility Zebra Browser Print, which enables bi-directional communication between the workstation and printer.
This means that any problems or maintenance is requiered such as consumables running out are communicated directly to the user within the FreshLot interface.
¶ Zebra Browser print
The Zebra Browser Print is a set of scripts and an end-user application that allows web pages to communicate with Zebra Printers. The application lets a web page communicate to Zebra devices accessible to the client's computer.
Install procedure:
- Double-click to run the ZebraBrowserPrin installer and initial set up following the steps.
- When the program runs for the first time, the End User License Agreement will pop up. Select I Agree.
- A pop-up about communicating with a web browser will appear. Click OK.
- From the new browser window, click Advanced, then click Proceed to localhost (unsafe).
Img - In a web browser, it displays the SSL Certificate has been accepted.
Img - For the pop-up requesting access to any connected Zebra devices, Select Yes.
- A Zebra logo icon appears in the system tray indicating that the Zebra Browser Print is running on your PC.
Img
- Add factual weight/UOM to item received
- Integrated vendor lot numbers with in-house generated barcode
- Pack date
- Expiry date
- Full visibility and tracking of partly received orders
- Order splitting
- Bulk weight lost settings
- Label printing
Detailed process flow
- Item configuration (lot tracking, lot formatting, barcode mask setup, vendor item)
- Retail receiving :
a. Supplier search
b. Available PO search
c. Double or assign location for receiving
d. Select Item (search list of items in the PO by ID or item name)
e. Input the following: Quantity or weight (option to weigh on a scale for exact Quantity to receive, no need of integration of hardware), Number of cases/boxes (To determine no. of barcodes to be printed with same label). - Lot Generation
- Receiving Barcode Printing
- Stick label to the case